


A Piercing Aftercare Checklist: Daily Steps for a Fast, Healthy Healing
- Jul 16, 2025
- 6 min read
Updated: Sep 9, 2025
📌 Key Takeaways
Simple Daily Routine Prevents Complications: Clean your piercing twice daily with sterile saline solution (0.9% sodium chloride), pat dry with paper towels, and let air dry completely. This balanced approach maintains cleanliness without over-cleaning, which can actually slow healing.
10 Critical Mistakes Can Derail Healing: Avoid touching with unwashed hands, using harsh products like alcohol or hydrogen peroxide, submerging in water, sleeping directly on the piercing, and removing jewelry before complete healing. Never use antibiotic creams or ointments as they trap bacteria and prevent proper air circulation.
Know Normal vs. Concerning Signs: Mild tenderness, swelling, and clear discharge are normal for 3-5 days. Seek professional help for excessive pain that worsens, hot spreading redness, yellow/green pus with odor, red streaking, or fever.
Healing Takes Longer Than Appearance Suggests: Full healing varies dramatically by location—earlobes take 2-3 months while cartilage piercings require 6-12 months. Your piercing is truly healed when there's no discharge, no tenderness, and skin has a matte finish rather than shiny new healing appearance.
Professional Assessment Prevents Setbacks: Have a professional piercer confirm complete healing before changing jewelry, as internal healing takes much longer than external appearance suggests.
This comprehensive aftercare routine transforms post-piercing anxiety into confidence, ensuring your investment heals perfectly while building the foundation for future body art decisions. This content is informational only and does not constitute medical advice—consult with a healthcare professional or qualified piercer for individual circumstances.
Getting a new piercing is exciting—but that moment when you leave the studio can feel overwhelming. What exactly should you be doing to make sure your piercing heals perfectly? The good news is that proper aftercare doesn't have to be complicated or stressful.
Think of piercing aftercare like caring for any other investment in your appearance. You wouldn't skip washing your face or brushing your teeth, right? Your new piercing deserves the same consistent, gentle attention. This simple daily routine will transform those post-piercing worries into confidence that you're doing everything right.
Key Terms You Need to Know:
• Sterile saline solution: A 0.9% sodium chloride solution with no additives, the gold standard for piercing care
• Healing discharge: Clear or slightly yellow fluid that's normal during the healing process
• Migration: When a piercing moves from its original position (a sign of irritation)
The Simple Daily Routine to Keep Your New Piercing Clean
Here's your foolproof daily checklist—print it out, save it to your phone, or stick it on your bathroom
mirror. Following these steps consistently is the most important thing you can do for a successful heal.
Morning Routine (Every Day):
Wash your hands thoroughly with antibacterial soap before touching anything near your piercing
Spray sterile saline solution directly onto the piercing area
Allow the saline to sit for 30-60 seconds to soften any dried discharge
Gently pat dry with a clean paper towel (never use cloth towels that can harbor bacteria)
Let the area air dry completely
Evening Routine (Before Bed):
Repeat the morning cleaning process to remove any debris from the day
Check for any changes in appearance, swelling, or discharge
Apply additional saline solution if there's visible buildup or discharge
Weekly Check-in: With thoroughly washed hands, gently check that the threaded ends of your jewelry are secure. Do not loosen them; simply ensure they are finger-tight to prevent accidental loss.
This routine works because it maintains the perfect balance—keeping your piercing clean without over-cleaning, which can actually slow healing. The saline solution mimics your body's natural fluids, supporting the healing process rather than disrupting it.
10 Healing Mistakes to Avoid at All Costs

Your piercing wants to heal, but these common mistakes can interfere with the natural process. Avoid these pitfalls and you'll be amazed at how smoothly everything goes:
• Don't touch or play with your piercing unnecessarily—your hands carry bacteria even when they look clean
• Don't use soaps, cleansers, or products with fragrances, dyes, or harsh chemicals on your piercing
• Don't submerge your piercing in pools, hot tubs, lakes, or bathtubs during the entire healing period
• Don't sleep directly on your new piercing—use a travel pillow or sleep on the opposite side
• Don't remove or change jewelry until completely healed (healing times vary significantly by location)
• Don't use alcohol or hydrogen peroxide—these are too harsh and can damage healing tissue
• Don't pick at scabs or dried discharge—let them fall off naturally during cleaning
• Don't shave over the piercing area for at least 30 days
• Don't expose your piercing to excessive sunlight without protection
• Don't engage in intense workouts for the first week—sweat can irritate fresh piercings
Myth vs. Fact: Myth: Using antibiotic cream or ointments is the best way to heal a piercing.
Fact: Never put antibiotic cream or ointment on a piercing. These products can trap bacteria and prevent proper air circulation, actually slowing the healing process.
What If...? Planning for Signs of Irritation or Infection
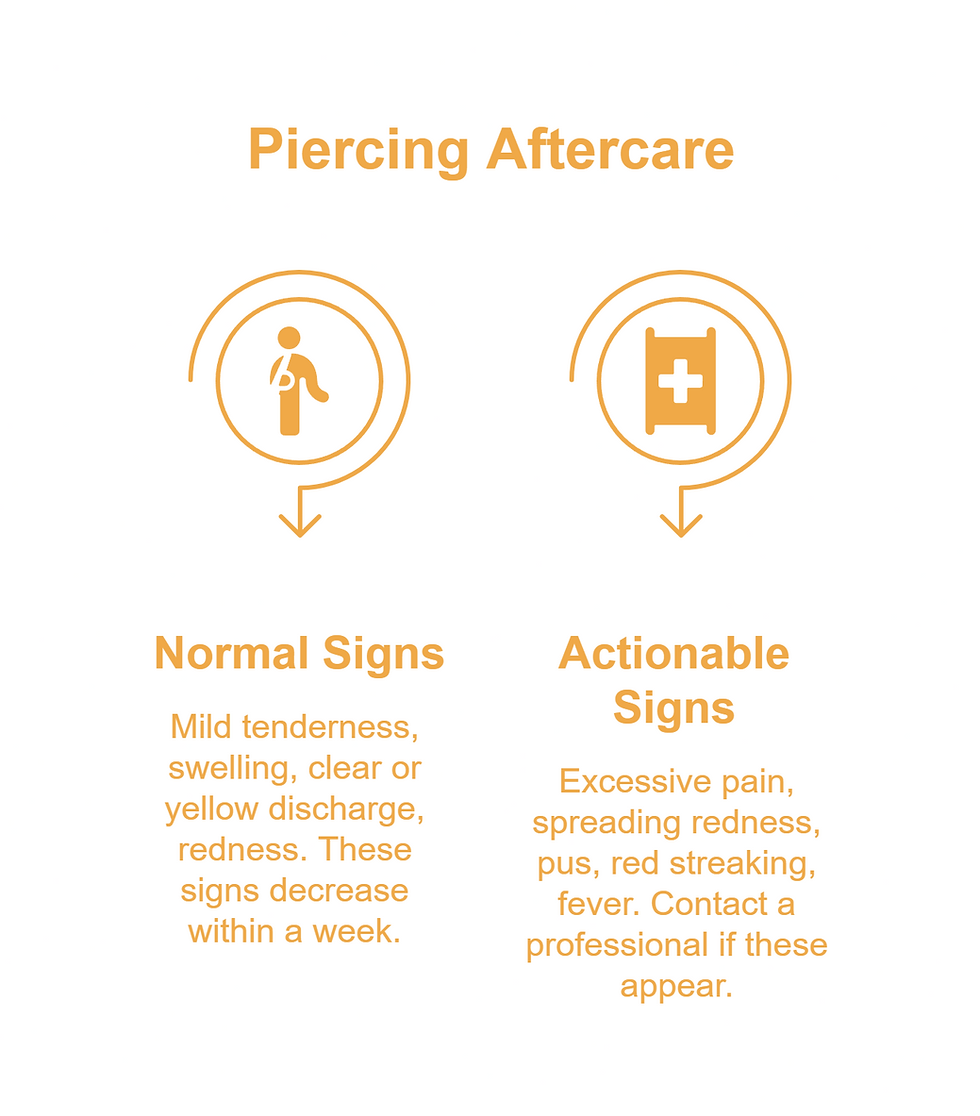
Here's the thing—some redness, swelling, and clear discharge are completely normal for the first few days. Your body is simply responding to the procedure, and these signs typically decrease within a week.
What's Normal:
• Mild tenderness and swelling for 3-5 days
• Clear or slightly yellow discharge (this is lymph fluid, not pus)
• Some redness around the piercing site initially
When to Take Action:
If you notice any of these signs, contact your piercing studio or healthcare provider:
• Excessive pain that gets worse instead of better after the first few days
• Hot, angry redness that spreads beyond the immediate piercing area
• Yellow or green pus with a strong odor
• Red streaking extending from the piercing site
• Fever or feeling unwell in addition to piercing symptoms
Your Action Plan:
Don't panic—most issues can be resolved quickly when caught early
Continue your cleaning routine unless advised otherwise
Take a photo to show your piercer or doctor the progression
Seek professional advice rather than trying home remedies
Remember, your piercing studio wants your piercing to heal perfectly too. They're your best resource for guidance specific to your situation.
Long-Term Value: Proper aftercare isn't just about avoiding problems—it's an investment in the longevity of your piercing. A well-healed piercing will look better, feel more comfortable, and give you years of enjoyment without complications.
A Question You Should Be Asking
"How do I know when my piercing is fully healed, not just looking good on the outside?"
This is crucial because many people change jewelry too soon or stop aftercare when their piercing looks healed on the surface. Internal healing takes much longer than what you can see.
Why This Matters: Changing jewelry or stopping care too early can damage tissue that's still healing internally, potentially causing irritation, migration, or even infection.
The Expert Answer:
Your piercing is fully healed when there's no more discharge, no tenderness to touch, and the skin has a matte finish rather than the shiny appearance of new healing skin. Healing times vary dramatically by location:
• Earlobe piercings: 2-3 months
• Cartilage piercings (helix, conch, tragus): 6-12 months
• Navel piercings: 6-12 months
• Nose piercings: 3-6 months
• Lip piercings: 2-4 months
The safest approach? Wait until the minimum healing time has passed and have a professional piercer assess whether healing is complete before changing jewelry.
Peace of Mind: This timeline might seem long, but patience now means years of trouble-free enjoyment. Think of it as letting your body complete its natural healing process rather than rushing to the finish line.
Your Piercing is Healed—What's Next?
Following this aftercare routine consistently puts you in complete control of your healing process. No more wondering if you're doing something wrong or worrying about complications—you have a clear roadmap to success.
Style Note: Once fully healed, your piercing opens up a world of jewelry possibilities. High-quality materials like implant-grade titanium (ASTM F-136), solid 14k or 18k gold (nickel-free), or implant-grade steel (ASTM F-138) will keep your piercing happy while letting you express your personal style.
This successful healing experience is just the beginning of your body art journey. You've learned to care for your piercing like a pro, built confidence in the process, and discovered that professional body modification doesn't have to be scary or complicated. Many clients find that mastering their first piercing's aftercare gives them the knowledge and confidence to explore additional piercings or even consider other forms of body art like tattoos.
Your healed piercing represents more than just a beautiful accessory—it's proof that you can commit to self-care, follow through on decisions, and successfully navigate new experiences. Whether you're already planning your next piercing or simply enjoying your current one, you now have the foundation to make informed choices about your body art future.
Ready to take the next step in your piercing journey? [REF::the-miami-guide-to-a-safe-stylish-piercing]
Our Editorial Process: This tutorial was drafted with AI assistance and has been reviewed, fact-checked, and edited by the expert humans on our Insights Team to ensure accuracy and clarity.
About the Fame Tattoos Insights Team: The Fame Tattoos Insights Team is our dedicated engine for synthesizing complex topics into clear, helpful guides. While our content is thoroughly reviewed for clarity and accuracy, it is for informational purposes and should not replace professional advice.


.jpg)
.jpg)

.jpg)
.jpg)

.jpg)
.jpg)
.jpg)
.jpg)